本文将演示如何借助LangGraph4j + SpringAI来开发一个完整的智能体应用,实现用户传入地址、大模型通过Function Calling来获取地址天气,调用大模型的旅游项目推荐能力、美食推荐能力,给用返回一个旅游攻略
一、项目创建 1. 工程创建 首先我们需要创建一个 LangGraph4j + SpringAI的项目,对这块不熟悉的小伙伴,请参考 创建一个Langgraph4j示例工程
2. 核心依赖 本工程主要使用框架为 SpringAI1.0.1 + LangGraph4j1.6.0-rc4 + SpringBoot3.5.4
对应的大模型为: zhipu,通过SpringMVC提供访问接口
1 2 3 4 5 6 7 8 9 10 11 12 13 14 15 <dependencies > <dependency > <groupId > org.bsc.langgraph4j</groupId > <artifactId > langgraph4j-springai-agentexecutor</artifactId > <version > ${langgraph4j.version}</version > </dependency > <dependency > <groupId > org.springframework.boot</groupId > <artifactId > spring-boot-starter-web</artifactId > </dependency > <dependency > <groupId > org.springframework.ai</groupId > <artifactId > spring-ai-starter-model-zhipuai</artifactId > </dependency > </dependencies >
3. 配置文件 我们在配置文件application.yml中配置大模型密钥,使用其他大模型的小伙伴,请自行替换
1
2
3
4
5
6
7
8
spring: ai: zhipuai: api-key: ${zhipuai-api-key} chat: options: model: GLM-4-Flash
注意:大模型的选择时,需要判断是否支持FunctionCalling,如果不支持,则会影响本项目的实际运行效果
我们的密钥以启动参数的方式传递,方便测试(当然也可以直接写入配置文件、或者系统环境变量,大家按照自己的喜好即可)
二、智能体开发 1. 核心功能描述 智能体的主要功能为:
用户传入地址
设计一个WeatherAgent,用于获取给定地方的实时天气情况
若不需要进行旅游推荐,则直接返回
若需要进行旅游推荐
调用 TravelAgent,获取给定地址的附近旅游项目推荐
根据选定的旅游项目,调用 FoodAgent,获取给定地址的附近美食推荐
将上面的结果进行整合,以博文的方式返回给用户
2. 实现通用的AgentService 上面的几个Agent都需要与大模型进行交互,因此我们这里可以抽象出一个通用的AgentService,用于处理Agent与大模型的交互
1
2
3
4
5
6
7
8
9
10
11
12
13
14
15
16
17
18
19
20
21
22
23
24
25
26
27
28
29
30
31
32
@Service public class AgentService { private static final Logger log = LoggerFactory.getLogger(AgentService.class); private final ChatClient chatClient; public AgentService (ChatModel chatModel) { this .chatClient = ChatClient.builder(chatModel) .defaultSystem("You are now an AI assistant that provides weather, travel, and food recommendations." ) .defaultTools(new WeatherTools ()) .build(); } public String execute (String system, String input) { try { if (input == null || input.isBlank()) { throw new IllegalArgumentException ("input is blank." ); } log.info("[Call LLM] query: {} " , input); return chatClient.prompt() .system(system) .user(input) .call() .content(); } catch (Exception e) { log.error("some exception for input = '{}': {}" , input, e.getMessage(), e); throw new RuntimeException ("error, try later!" , e); } } }
因为大模型本身是无法获取天气信息的,因此我们这里使用FunctionCalling的方式,给大家装配上天气查询的能力(当然这里也可以直接使用天气相关的McpServer)
我们这里简单的实现一个 WeatherTools 来模拟天气的查询(真实场景中,可以实现第三方天气服务查询API)
1
2
3
4
5
6
7
8
9
10
11
12
13
14
15
16
17
18
19
20
public class WeatherTools { private static final Logger log = LoggerFactory.getLogger(WeatherTools.class); @Tool(description = "根据传入的地区,返回对应地区的当前天气") public WeatherResponse currentWeatherFunction (WeatherRequest request) { List<String> weathers = List.of("rain" , "cloudy" , "storm" , "thunder" , "snow" ); List<String> temps = List.of("32°" , "18°" , "10°" , "5°" , "0°" ); WeatherResponse response = new WeatherResponse (request.area(), weathers.get((int ) (Math.random() * weathers.size())) + " " + temps.get((int ) (Math.random() * temps.size()))); log.info("[WeatherTools] response weather: {}" , response); return response; } public record WeatherRequest ( @JsonPropertyDescription("请求的地区,可以是省市区镇街道,如北京、上海、武汉市洪山区、北京朝阳街道") String area) { } public record WeatherResponse (@JsonPropertyDescription("用户请求的地区") String area, @JsonPropertyDescription("地区对应的当前天气,如 晴 32°, 小雨 18°") String weather) { } }
3. 定义TravelState存储上下文 我们这里定义一个 TravelState 继承自 AgentState 来实现多智能体之间的数据共享,由于我们这里存在4个智能体,我们为每个智能体的返回都定义一个对应的参数进行承接
1
2
3
4
5
6
7
8
9
10
11
12
13
14
15
16
17
18
19
20
21
22
23
24
25
26
27
28
29
30
31
public class TravelState extends AgentState { public static final String INPUT = "input" ; public static final String WEATHER = "weather" ; public static final String TRAVEL = "recommendation" ; public static final String FOOD = "food" ; public static final String BLOG = "blog" ; public TravelState (Map<String, Object> initData) { super (initData); } public String getInput () { return (String) value(INPUT).orElse("" ); } }
上面定义了五个常量,其中 INPUT 为最开始的输入参数, WEATHER 为 WeatherAgent执行后的返回的天气信息, TRAVEL 为 TravelRecommendAgent 执行后返回推荐游玩项目, FOOD 为 FoodRecommendAgent 执行后返回推荐美食, BLOG 为 XhsBlogGenerateAgent 执行后汇总生成的小红书风格的博文内容
不同的Agent返回的数据内容并不相同,可以是基本类型、字符串,也可以是集合、Java POJO对象,由于LangGraphJ自己实现了一套序列化协议,因此我们这里先提供一个JsonSerializer,用于非简单的对象的序列化处理
1
2
3
4
5
6
7
8
9
10
11
12
13
14
15
16
17
18
19
20
21
22
23
24
25
26
27
28
29
30
31
32
33
34
35
36
37
38
39
40
41
42
43
44
45
46
47
48
49
50
51
52
public class JsonSerializer <T> implements Serializer <T> { private Class<T> type; public JsonSerializer (Class<T> type) { this .type = type; } @Override public void write (T recommendRes, ObjectOutput objectOutput) throws IOException { String text = JsonUtil.toStr(recommendRes); objectOutput.writeObject(text); } @Override public T read (ObjectInput objectInput) throws IOException, ClassNotFoundException { String json = Objects.toString(objectInput.readObject()); return JsonUtil.toObj(json, type); } } public class JsonUtil { private static ObjectMapper mapper = new ObjectMapper (); static { mapper.findAndRegisterModules(); SimpleModule module = new SimpleModule (); mapper.registerModule(module ); mapper.disable(DeserializationFeature.FAIL_ON_UNKNOWN_PROPERTIES); } public static String toStr (Object o) { try { return mapper.writeValueAsString(o); } catch (IOException e) { throw new RuntimeException (e); } } public static <T> T toObj (String s, Class<T> clazz) { try { return mapper.readValue(s, clazz); } catch (IOException e) { throw new RuntimeException (e); } } }
4. 实现天气智能体 WeatherAgent 接下来我们实现第一个智能体,用于获取给定地方的天气
1
2
3
4
5
6
7
8
9
10
11
12
13
14
15
16
17
18
19
20
21
22
23
24
25
26
27
28
29
30
31
32
33
34
35
36
37
38
39
40
41
42
@Service public class WeatherAgent { private static final org.slf4j.Logger log = org.slf4j.LoggerFactory.getLogger(WeatherAgent.class); public static final String NAME = "weatherAgent" ; private final AgentService agentService; public WeatherAgent (AgentService agentService) { this .agentService = agentService; } public Map<String, Object> callWeatherAgent (TravelState state) { var query = state.getInput(); log.info("[callWeatherAgent]: {}, input: {}" , state, query); var response = agentService.weather("请帮我查询给定位置的实时天气\n" + query); Map<String, Object> output = new HashMap <>(); output.put(TravelState.WEATHER, response); log.info("[callWeatherAgent] Output: {}" , output); return output; } } @Service public class AgentService { public String weather (String input) { return execute("You are now an AI assistant for weather query" , input); } }
上面的整体实现比较简单,核心的在于方法 callWeatherAgent,我们会将它包装为LangGraph4J的Node,这个方法你可以理解为 NodeAction 的实现,对应的使用层Node的注册如下
1
2
new StateGraph <>(TravelState.serializer()) .addNode(WeatherAgent.NAME, node_async(weatherAgent::callWeatherAgent))
同样的,我们可以在 TravelState 中,提供一个直接获取天气的方法,返回的类型为String字符串
1
2
3
public String getWeather () { return (String) value(WEATHER).orElse("" ); }
5. 实现推荐项目智能体 TravelRecommendAgent 接下来我们实现第二个智能体,用于推荐给定地点的游玩项目,具体的实现方式可以参照上面天气智能体的实现
1
2
3
4
5
6
7
8
9
10
11
12
13
14
15
16
17
18
19
20
21
22
23
24
25
26
27
28
29
30
31
32
33
34
35
36
37
38
39
40
41
@Service public class TravelRecommendAgent { private static final org.slf4j.Logger log = org.slf4j.LoggerFactory.getLogger(TravelRecommendAgent.class); public static final String NAME = "travelAgent" ; private final AgentService agentService; public TravelRecommendAgent (AgentService agentService) { this .agentService = agentService; } public Map<String, Object> callTravelAgent (TravelState state) { var area = state.getInput(); var weather = state.getWeather(); log.info("[callTravelAgent]: {}, weather: {}" , state, weather); String prompts = """ 请结合现在的天气,帮我推荐三个适合这个天气游玩的项目 {area} {weather} """ ; PromptTemplate promptTemplate = new PromptTemplate (prompts); String prompt = promptTemplate.render(Map.of("area" , area, "weather" , weather)); var recommendation = agentService.travel(prompt); Map<String, Object> output = new HashMap <>(); output.put(TravelState.TRAVEL, recommendation); log.info("[callTravelAgent] Output: {}" , output); return output; } } @Service public class AgentService { public String travel (String input) { return execute("You are now an AI assistant for travel query" , input); } }
在旅游项目推荐的实现中,使用了前面返回的天气信息,作为提示词的输入,将大模型的返回结果保存到State中给后续的节点使用;同样的,我们可以在 TravelState 中,提供获取推荐项目的方法
1
2
3
public String getTravel () { return (String) value(TRAVEL).orElse("" ); }
6. 实现美食智能体 FoodAgent 接下来我们实现第三个智能体,基于旅游项目的美食推荐(如果条件允许,当然是推荐借助百度/高德地图的MCPServer来实现),具体的实现方式可以参照上面天气智能体的实现
1
2
3
4
5
6
7
8
9
10
11
12
13
14
15
16
17
18
19
20
21
22
23
24
25
26
27
28
29
30
31
32
33
34
35
36
37
38
39
40
41
42
43
44
45
46
47
48
49
50
51
52
53
54
55
56
57
58
@Service public class FoodRecommendAgent { private static final org.slf4j.Logger log = org.slf4j.LoggerFactory.getLogger(FoodRecommendAgent.class); public static final String NAME = "foodAgent" ; private final AgentService agentService; public FoodRecommendAgent (AgentService agentService) { this .agentService = agentService; } public Map<String, Object> callFoodAgent (TravelState state) { var travel = state.getTravel(); log.info("[callFoodAgent]: {}, travel: {}" , state, travel); var outputConverter = new BeanOutputConverter <>(TravelFoodRecommends.class); var prompt = """ 现在的天气是 {weather} 请结合下面推荐的旅游游玩项目,帮我为每个项目推荐三种美食 {travel} {format} """ ; var promptTemplate = new PromptTemplate (prompt); var userMsg = promptTemplate.render(Map.of("weather" , state.getWeather(), "travel" , travel, "format" , outputConverter.getFormat())); var foodSuggestion = agentService.food(userMsg); var res = outputConverter.convert(foodSuggestion); Map<String, Object> output = new HashMap <>(); output.put(TravelState.FOOD, res); log.info("Food Agent Output: {}" , output); return output; } public record TravelFoodRecommends (@JsonPropertyDescription("天气") String weather, @JsonPropertyDescription("不同旅游项目的美食推荐") List<FoodSuggestion> food) { } public record FoodSuggestion (@JsonPropertyDescription("推荐的游玩项目") String travel, @JsonPropertyDescription("项目推荐原因") String travelReason, @JsonPropertyDescription("适合这个旅游项目的美食推荐列表") List<FoodItem> foods) { } public record FoodItem (@JsonPropertyDescription("推荐的美食名") String foodName, @JsonPropertyDescription("推荐这个美食的原因") String recommendReason) { } } @Service public class AgentService { public String food (String input) { return execute("You are now an AI assistant for food query" , input); } }
这个实现,相比于前面的旅游项目Agent的实现会更复杂一点,利用了前面返回的天气和旅游项目,借助了SpringAI的提示词模板 + 结构化输出来实现美食推荐,我们可以在 TravelState 中,提供获取美食推荐列表的方法
1
2
3
public FoodRecommendAgent.TravelFoodRecommends getFood () { return (FoodRecommendAgent.TravelFoodRecommends) value(FOOD).orElse(new FoodRecommendAgent .TravelFoodRecommends("" , List.of())); }
7. 实现小红书博文智能体 XhsBlogGenerateAgent 最后我们实现第四个智能体,基于美食推荐,生成小红书的博文;我们这里做一个分支处理,如果是直接由WeatherAgent转过来的,那么我们作为一个天气预报的Agent;如果是由FoodAgent转过来的,那么我们作为一个小红书的旅游美食推荐Agent
1
2
3
4
5
6
7
8
9
10
11
12
13
14
15
16
17
18
19
20
21
22
23
24
25
26
27
28
29
30
31
32
33
34
35
36
37
38
39
40
41
42
43
44
45
46
47
48
49
50
51
52
53
54
55
@Service public class XhsBlogGenerateAgent { private static final org.slf4j.Logger log = org.slf4j.LoggerFactory.getLogger(XhsBlogGenerateAgent.class); public static final String NAME = "xhsAgent" ; private final AgentService agentService; public XhsBlogGenerateAgent (AgentService agentService) { this .agentService = agentService; } public Map<String, Object> callResponseAgent (TravelState state) { log.info("[XhsBlogGenerateAgent]: {}" , state); var response = state.getFood(); String prompt; String systemPrompt; BeanOutputConverter outputConverter; if (response != null && !CollectionUtils.isEmpty(response.food())) { outputConverter = new BeanOutputConverter <>(TravelResVo.class); systemPrompt = "你现在是一个资深的小红书旅游博主运营专家,擅长根据给出地点、天气、推荐项目、推荐美食来生成吸引人阅读的博文" ; String prompts = """ 下面是我现在准备的一些素材,请帮我写一份小红书风格的推荐博文,以中文方式返回 {weather} {recommends} {format} """ ; PromptTemplate promptTemplate = new PromptTemplate (prompts); prompt = promptTemplate.render(Map.of("weather" , state.getWeather(), "recommends" , JsonUtil.toStr(response), "format" , outputConverter.getFormat())); } else { outputConverter = new BeanOutputConverter <>(SimpleResVo.class); systemPrompt = "你现在是一个资深的天气预报专家,擅长根据给天气给出合理的关注事项建议" ; String prompts = """ 下面我输入的是天气,请以贴心关怀的语气生成一段天气预报的文案,并配上这个天气的注意事项,以中文的方式返回给我 {weather} {format} """ ; PromptTemplate promptTemplate = new PromptTemplate (prompts); prompt = promptTemplate.render(Map.of("weather" , state.getWeather(), "format" , outputConverter.getFormat())); } String recommendation = agentService.execute(systemPrompt, prompt); Map<String, Object> output = new HashMap <>(); output.put(TravelState.BLOG, outputConverter.convert(recommendation)); log.info("[XhsBlogGenerateAgent] Output: {}" , output); return output; } }
两个不同的分支,返回的内容稍有区别,定义如下
1
2
3
4
5
6
7
8
9
10
11
12
13
14
15
16
17
@Data public class SimpleResVo implements Serializable { private static final long serialVersionUID = 8147413953959189557L ; @JsonPropertyDescription("推荐标题") private String title; @JsonPropertyDescription("推荐内容") private String content; } @Data @ToString(callSuper = true) public class TravelResVo extends SimpleResVo { private static final long serialVersionUID = 6808399653463811338L ; @JsonPropertyDescription("推荐的项目") private List<FoodRecommendAgent.TravelFoodRecommends> travels; }
同样的,我们可以在 TravelState 中,提供获取最终博文数据的方法
1
2
3
public SimpleResVo getBlog () { return (SimpleResVo) value(BLOG).orElse(new SimpleResVo ()); }
8. TravelState序列化 当上面四个智能体实现完毕之后,TravelState中存储的上下文也都可以确定了,接下来我们定义它的序列化方式
1
2
3
4
5
6
7
8
9
10
11
12
13
14
15
public class TravelState extends AgentState { public static StateSerializer<TravelState> serializer () { var serializer = new ObjectStreamStateSerializer <>(TravelState::new ); serializer.mapper().register(Message.class, new MessageSerializer ()); serializer.mapper().register(FoodRecommendAgent.TravelFoodRecommends.class, new JsonSerializer <>(FoodRecommendAgent.TravelFoodRecommends.class)); serializer.mapper().register(TravelResVo.class, new JsonSerializer <>(TravelResVo.class)); serializer.mapper().register(SimpleResVo.class, new JsonSerializer <>(SimpleResVo.class)); return serializer; } }
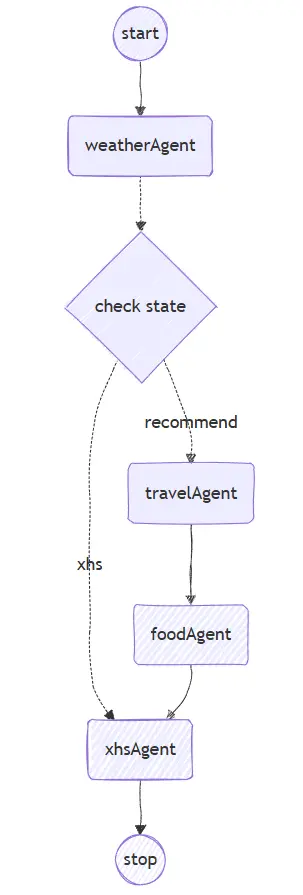
9. 实现多智能体调用的 AgentExecutor 上面的智能体实现之后,我们接下来需要实现 AgentExecutor,在这里定义StateGraph,执行多智能体的调用
1
2
3
4
5
6
7
8
9
10
11
12
13
14
15
16
17
18
19
20
21
22
23
24
25
26
27
28
29
30
31
32
33
34
35
36
37
38
39
40
41
42
43
44
45
46
47
48
49
50
51
52
53
54
55
56
57
58
@Service public class MAgentExecutor { private static final Logger log = LoggerFactory.getLogger(MAgentExecutor.class); private final WeatherAgent weatherAgent; private final TravelRecommendAgent travelAgent; private final FoodRecommendAgent foodAgent; private final XhsBlogGenerateAgent xhsBlogGenerateAgent; private final CompiledGraph<TravelState> compiledGraph; public MAgentExecutor (WeatherAgent weatherAgent, TravelRecommendAgent travelAgent, FoodRecommendAgent foodAgent, XhsBlogGenerateAgent xhsBlogGenerateAgent) throws GraphStateException { this .weatherAgent = weatherAgent; this .travelAgent = travelAgent; this .foodAgent = foodAgent; this .xhsBlogGenerateAgent = xhsBlogGenerateAgent; this .compiledGraph = new GraphBuilder ().build().compile(); this .printPlantUml(); } public CompiledGraph<TravelState> getCompiledGraph () { return compiledGraph; } public TravelState invoke (String input) { return getCompiledGraph() .invoke(Map.of(TravelState.INPUT, input)) .orElseGet(() -> new TravelState (Map.of("Error" , "NoDataResponse" ))); } public class GraphBuilder { public StateGraph<TravelState> build () throws GraphStateException { var shouldContinue = (EdgeAction<TravelState>) state -> { log.info("shouldContinue RecommendAgent state: {}" , state); return state.getInput().contains("recommendations" ) || state.getInput().contains("推荐" ) ? "recommend" : "xhs" ; }; return new StateGraph <>(TravelState.serializer()) .addNode(WeatherAgent.NAME, node_async(weatherAgent::callWeatherAgent)) .addNode(TravelRecommendAgent.NAME, node_async(travelAgent::callTravelAgent)) .addNode(FoodRecommendAgent.NAME, node_async(foodAgent::callFoodAgent)) .addNode(XhsBlogGenerateAgent.NAME, node_async(xhsBlogGenerateAgent::callResponseAgent)) .addEdge(START, WeatherAgent.NAME) .addConditionalEdges(WeatherAgent.NAME, edge_async(shouldContinue), Map.of( "recommend" , TravelRecommendAgent.NAME, "xhs" , XhsBlogGenerateAgent.NAME ) ) .addEdge(TravelRecommendAgent.NAME, FoodRecommendAgent.NAME) .addEdge(FoodRecommendAgent.NAME, XhsBlogGenerateAgent.NAME) .addEdge(XhsBlogGenerateAgent.NAME, END); } } }
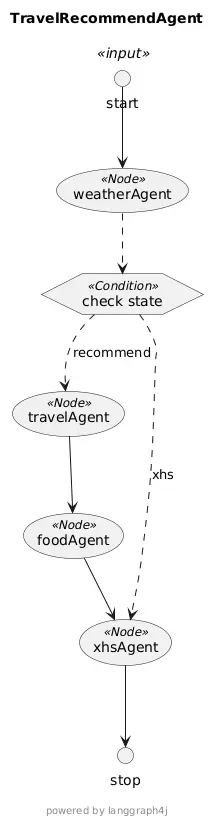
上面的核心在与GraphBuilder.build()的实现,在这个实现中,定义了AgentState、Node、Edge、ConditionEdge,通过他们构建了一个有向图,我们可以通过下面这个方法打印下这个多智能体执行的PantUML
1 2 3 4 5 6 7 8 9 10 11 12 13 14 15 16 17 18 private String printPlantUml () { GraphRepresentation representation = compiledGraph.getGraph(GraphRepresentation.Type.PLANTUML, "TravelRecommendAgent" , true ); System.out.println(">>>>>>>>>>>> online uml render site: https://www.plantuml.com/plantuml/uml/SyfFKj2rKt3CoKnELR1Io4ZDoSa700002" ); System.out.println("=== PlantUML Start ===" ); System.out.println(representation.content()); System.out.println("------- PlantUML End ---------" ); return representation.content(); }
输出
1
2
3
4
5
6
7
8
9
10
11
12
13
14
15
16
17
18
19
20
21
22
23
24
25
26
27
@startuml TravelRecommendAgent skinparam usecaseFontSize 14 skinparam usecaseStereotypeFontSize 12 skinparam hexagonFontSize 14 skinparam hexagonStereotypeFontSize 12 title "TravelRecommendAgent" footer powered by langgraph4j end footer circle start<<input>> as __START__ circle stop as __END__ usecase "weatherAgent"<<Node>> usecase "travelAgent"<<Node>> usecase "foodAgent"<<Node>> usecase "xhsAgent"<<Node>> hexagon "check state" as condition1<<Condition>> "__START__" -down-> "weatherAgent" "weatherAgent" .down.> "condition1" "condition1" .down.> "travelAgent": "recommend" '"weatherAgent" .down.> "travelAgent": "recommend" "condition1" .down.> "xhsAgent": "xhs" '"weatherAgent" .down.> "xhsAgent": "xhs" "travelAgent" -down-> "foodAgent" "foodAgent" -down-> "xhsAgent" "xhsAgent" -down-> "__END__" @enduml
10. 测试验证 接下来我们实现一个端点,用于用户的推荐交互
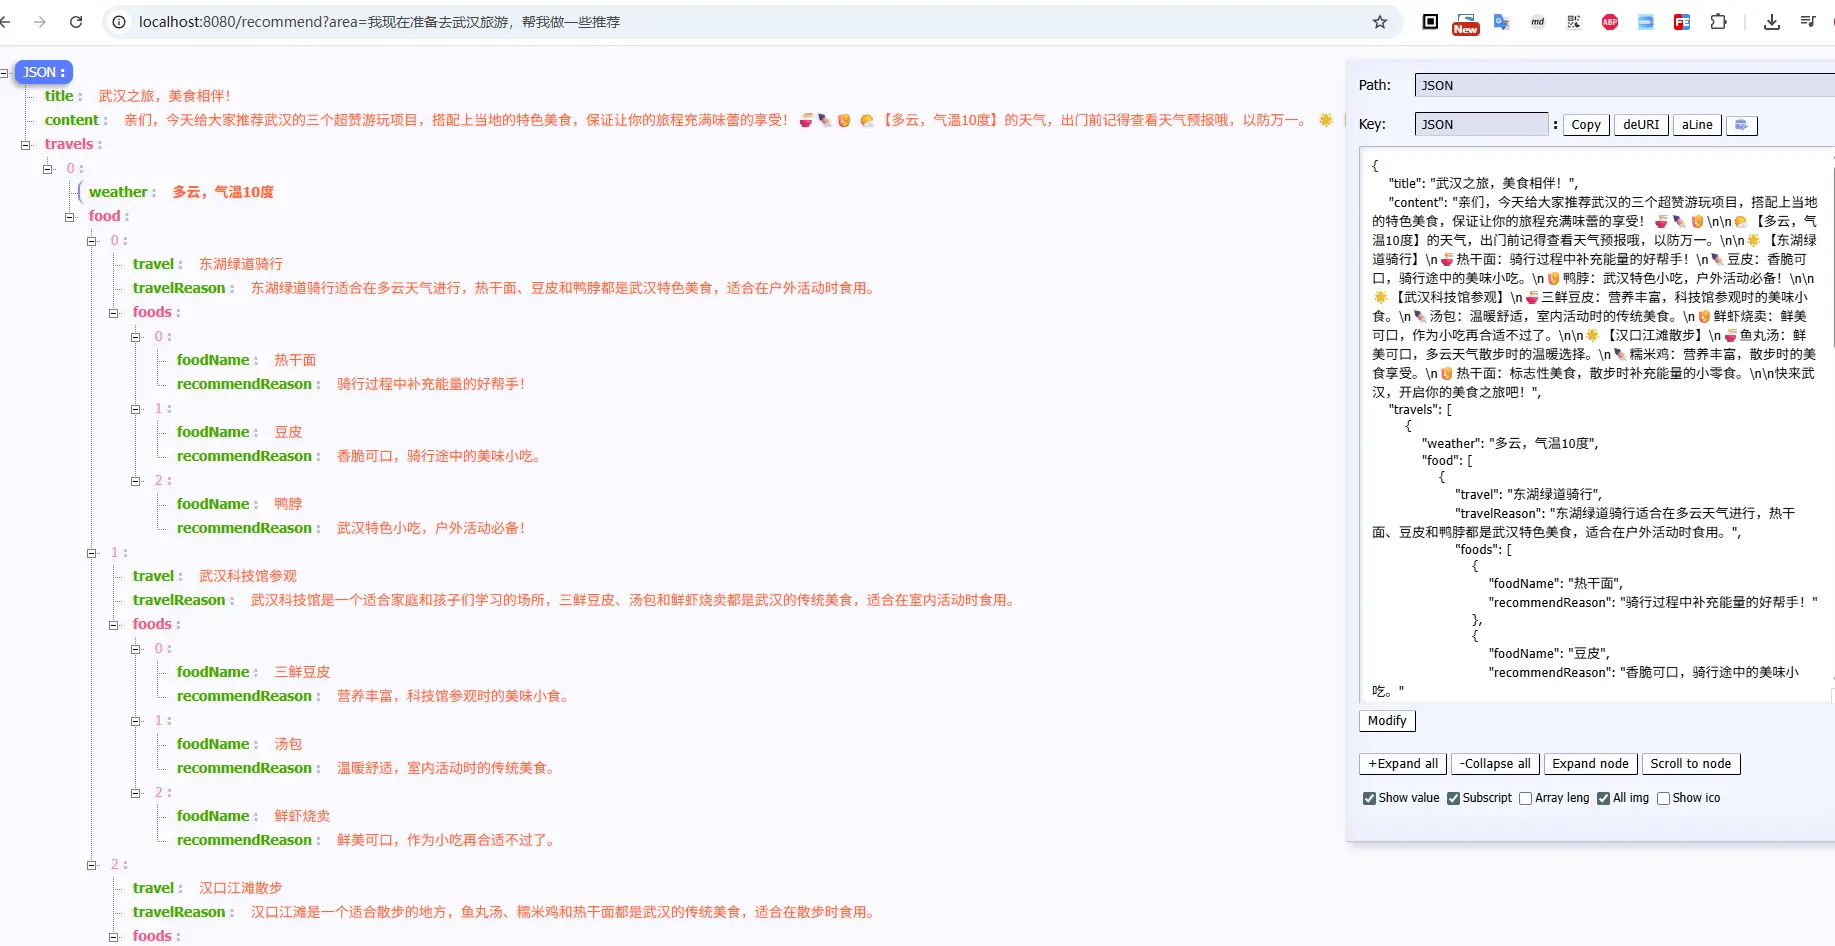
1
2
3
4
5
6
7
8
9
10
11
12
13
14
15
16
@RestController public class TravelController { private final MAgentExecutor mAgentExecutor; public TravelController (MAgentExecutor mAgentExecutor) { this .mAgentExecutor = mAgentExecutor; } @GetMapping("/recommend") public SimpleResVo recommend (String area) { var result = mAgentExecutor.invoke(area); return result.getBlog(); } }
小红书生成风格博文生成(传参中包含推荐二字):
1 curl 'http://localhost:8080/recommend?area=我现在准备去武汉旅游,帮我做一些推荐'
天气预报的信息生成(传参中不包含推荐二字)
1 curl 'http://localhost:8080/recommend?area=我现在准备去武汉旅游'
三、小结 本文通过逐步拆解的方式,给大家演示了如何借助 SpringAI + LangGraphJ + 智普大模型 从0到1创建一个多智能体应用,虽然现在的效果还一般,这个主要还是我的提示词和响应还不够优雅,整个业务的流程还是完整流畅的。有兴趣的小伙伴也可以实际的体验一下
上文虽然实现步骤相对清晰,但是内中原理和知识点,还是比较多的,对于上面实现的步骤有疑问的小伙伴,可以仔细阅读一下我的 SpringAI系列博文 相信能解决你的大部分疑问
文中所有涉及到的代码,可以到项目中获取 https://github.com/liuyueyi/spring-ai-demo
微信公众号: 一灰灰Blog 尽信书则不如,以上内容,纯属一家之言,因个人能力有限,难免有疏漏和错误之处,如发现bug或者有更好的建议,欢迎批评指正,不吝感激
下面一灰灰的个人博客,记录所有学习和工作中的博文,欢迎大家前去逛逛
打赏
如果觉得我的文章对您有帮助,请随意打赏。
微信打赏
支付宝打赏