前面介绍了两种Mybatis的数据源配置,当然也少不了mybatis-plus
MyBatis-Plus (opens new window)(简称 MP)是一个 MyBatis (opens new window)的增强工具,在 MyBatis 的基础上只做增强不做改变,既然做增强,那多数据源这种硬性场景,肯定是有非常简单的解决方案的
本文将实例演示Mybatis-Plus多数据源的配置
I. 环境准备
1. 数据库相关
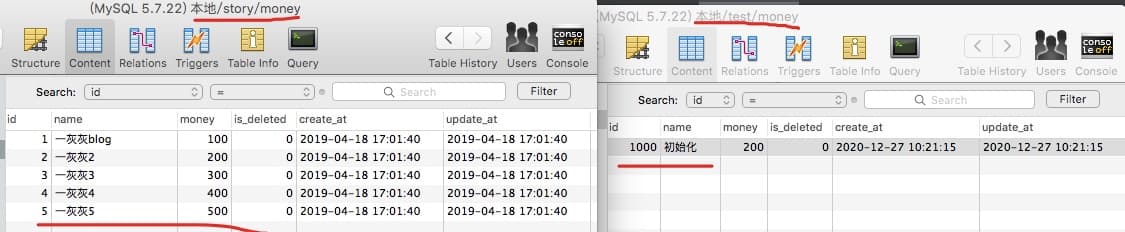
以mysql为例进行演示说明,因为需要多数据源,一个最简单的case就是一个物理库上多个逻辑库,本文是基于本机的mysql进行操作
创建数据库test 与 story,两个库下都存在一个表money (同名同结构表,但是数据不同哦)
1
2
3
4
5
6
7
8
9
10
| CREATE TABLE `money` (
`id` int(11) unsigned NOT NULL AUTO_INCREMENT,
`name` varchar(20) NOT NULL DEFAULT '' COMMENT '用户名',
`money` int(26) NOT NULL DEFAULT '0' COMMENT '钱',
`is_deleted` tinyint(1) NOT NULL DEFAULT '0',
`create_at` timestamp NOT NULL DEFAULT CURRENT_TIMESTAMP COMMENT '创建时间',
`update_at` timestamp NOT NULL DEFAULT CURRENT_TIMESTAMP ON UPDATE CURRENT_TIMESTAMP COMMENT '更新时间',
PRIMARY KEY (`id`),
KEY `name` (`name`)
) ENGINE=InnoDB AUTO_INCREMENT=1 DEFAULT CHARSET=utf8mb4;
|
2. 项目环境
本项目借助SpringBoot 2.2.1.RELEASE + maven 3.5.3 + IDEA进行开发
下面是核心的pom.xml(源码可以再文末获取)
1
2
3
4
5
6
7
8
9
10
11
12
13
14
15
16
17
18
| <dependencies>
<dependency>
<groupId>mysql</groupId>
<artifactId>mysql-connector-java</artifactId>
</dependency>
<dependency>
<groupId>com.baomidou</groupId>
<artifactId>dynamic-datasource-spring-boot-starter</artifactId>
<version>3.3.1</version>
</dependency>
<dependency>
<groupId>com.baomidou</groupId>
<artifactId>mybatis-plus-boot-starter</artifactId>
<version>3.3.1</version>
</dependency>
</dependencies>
|
配置文件信息application.yml,请注意下面的写法格式,如有疑问可以参考官方教程
1
2
3
4
5
6
7
8
9
10
11
12
13
14
15
16
| spring:
datasource:
dynamic:
primary: story
strict: false
datasource:
story:
driver-class-name: com.mysql.cj.jdbc.Driver
url: jdbc:mysql://127.0.0.1:3306/story?useUnicode=true&characterEncoding=UTF-8&useSSL=false&serverTimezone=Asia/Shanghai
username: root
password:
test:
driver-class-name: com.mysql.cj.jdbc.Driver
url: jdbc:mysql://127.0.0.1:3306/test?useUnicode=true&characterEncoding=UTF-8&useSSL=false&serverTimezone=Asia/Shanghai
username: root
password:
|
II. 项目演示
本文主要参考自Mybatis-Plus官方教程,如后续版本有啥变动,请以官方说明为准
https://mp.baomidou.com/guide/dynamic-datasource.html#%E6%96%87%E6%A1%A3-documentation
1. 实体类
mybatis-plus可以借助插件实现自动生成相应的代码,我们这里简单自主实现测试demo,因为两个数据库中表结构完全一致,所以只需要一个Entity
1
2
3
4
5
6
7
8
9
10
11
12
13
14
15
16
17
18
19
20
21
22
23
| @Data
@Accessors(chain = true)
@TableName(value = "money")
public class MoneyPo {
@TableId(value = "id", type = IdType.AUTO)
private Integer id;
private String name;
private Long money;
@TableField("is_deleted")
private Integer isDeleted;
@TableField(value = "create_at")
private Timestamp createAt;
@TableField(value = "update_at")
private Timestamp updateAt;
}
|
2. Mapper接口
数据库操作定义接口MoneyMapper
1
2
| public interface MoneyMapper extends BaseMapper<MoneyPo> {
}
|
对应的xml文件resources/mapper/money-mapper.xml
1
2
3
4
| <?xml version="1.0" encoding="UTF-8"?>
<!DOCTYPE mapper PUBLIC "-//mybatis.org//DTD Mapper 3.0//EN" "http://mybatis.org/dtd/mybatis-3-mapper.dtd">
<mapper namespace="com.git.hui.boot.multi.datasource.mapper.MoneyMapper">
</mapper>
|
3. Service接口与实现
因为两张表,所以我们可以定义一个接口,两个不同的实现
1
2
3
4
5
6
7
8
9
10
11
12
| public interface MoneyService extends IService<MoneyPo> {
}
@Service
@DS("story")
public class StoryMoneyServiceImpl extends ServiceImpl<MoneyMapper, MoneyPo> implements MoneyService {
}
@Service
@DS("test")
public class TestMoneyServiceImpl extends ServiceImpl<MoneyMapper, MoneyPo> implements MoneyService {
}
|
请注意上面Service的注解@DS,value为前面数据源配置文件中的key(spring.datasource.dynamic.datasource下面的story + test)
这个注解可以放在类上也可以放在方法上,方法上的优先级 > 类,所以上面的两个Service实现可以改成一个
1
2
3
4
5
6
7
8
9
10
11
12
13
| @Service
public class MoneyServiceImpl extends ServiceImpl<MoneyMapper, MoneyPo> implements MoneyService {
@DS("story")
public List<MoneyPo> findByStoryIds(Collection<Long> ids) {
return baseMapper.selectBatchIds(ids);
}
@DS("test")
public List<MoneyPo> findByTestIds(Collection<Long> ids) {
return baseMapper.selectBatchIds(ids);
}
}
|
4. 测试
为简单起见,直接在启动类中添加写上测试代码
1
2
3
4
5
6
7
8
9
10
11
12
13
14
15
16
17
| @SpringBootApplication
@MapperScan("com.git.hui.boot.multi.datasource.mapper")
public class Application {
public Application(TestMoneyServiceImpl testMoneyService, StoryMoneyServiceImpl storyMoneyService) {
List<MoneyPo> moneyPoList = testMoneyService.listByIds(Arrays.asList(1, 1000));
System.out.println(moneyPoList);
System.out.println("--------------");
moneyPoList = storyMoneyService.listByIds(Arrays.asList(1, 1000));
System.out.println(moneyPoList);
}
public static void main(String[] args) {
SpringApplication.run(Application.class);
}
}
|

II. 其他
0. 项目
相关博文
源码
1. 一灰灰Blog
尽信书则不如,以上内容,纯属一家之言,因个人能力有限,难免有疏漏和错误之处,如发现bug或者有更好的建议,欢迎批评指正,不吝感激
下面一灰灰的个人博客,记录所有学习和工作中的博文,欢迎大家前去逛逛

打赏
如果觉得我的文章对您有帮助,请随意打赏。

微信打赏

支付宝打赏