之前介绍solr的教程中,solr没有开启权限校验,所有的操作都是无需鉴权;当时提到,如果solr开启了权限校验,改一下solr的host,带上用户名/密码即可,然而真实情况却并不太一样,查询ok,涉及到修改的操作,则会抛异常
本文将带你了解一下,这到底是个什么鬼畜现象
I. Solr配置用户登录
1. 安装
之前的solr系列教程中,通过docker安装的solr,下面的步骤也是直接针对docker中的solr进行配置,基本步骤一样
具体可以参考: 【搜索系列】Solr环境搭建与简单测试
不想看的同学,直接用下面的命令即可:
1
2
| docker pull solr
docker run --name my-solr -d -p 8983:8983 -t solr
|
2. 配置
下面一步一步教你如何设置用户密码,也可以参考博文: 手把手教你 对 solr8 配置用户登录验证
进入实例,注意使用root用户,否则某些操作可能没有权限
1
| docker exec -u root -it my-solr /bin/bash
|
创建鉴权文件
1
| vim server/etc/verify.properties
|
内容如下,格式为 用户名:密码,权限, 一行一个账号
配置鉴权文件
1
| vim server/contexts/solr-jetty-context.xml
|
添加下面的内容放在Configure标签内
1
2
3
4
5
6
7
8
| <Get name="securityHandler">
<Set name="loginService">
<New class="org.eclipse.jetty.security.HashLoginService">
<Set name="name">verify—name</Set>
<Set name="config"><SystemProperty name="jetty.home" default="."/>/etc/verify.properties</Set>
</New>
</Set>
</Get>
|
修改web.xml
1
| vim server/solr-webapp/webapp/WEB-INF/web.xml
|
在security-constraint标签下面,新增
1
2
3
4
5
| <login-config>
<auth-method>BASIC</auth-method>
<realm-name>verify-name</realm-name>
</login-config>
|
重启solr,配置生效
II. 场景复现
接下来介绍一下我们的环境
- springboot: 2.2.1.RELEASE
- solr: 8.0
1. 项目环境
搭建一个简单的springboot项目,xml依赖如下
1
2
3
4
5
6
7
8
9
10
11
12
13
14
15
16
17
18
19
20
21
22
23
24
25
26
27
28
29
30
31
32
33
34
35
36
37
38
39
40
41
42
43
44
45
46
47
48
49
50
51
52
53
54
55
56
57
58
59
60
61
62
| <parent>
<groupId>org.springframework.boot</groupId>
<artifactId>spring-boot-starter-parent</artifactId>
<version>2.2.1.RELEASE</version>
<relativePath/>
</parent>
<properties>
<project.build.sourceEncoding>UTF-8</project.build.sourceEncoding>
<project.reporting.outputEncoding>UTF-8</project.reporting.outputEncoding>
<java.version>1.8</java.version>
</properties>
<dependencies>
<dependency>
<groupId>org.springframework.boot</groupId>
<artifactId>spring-boot-starter-data-solr</artifactId>
</dependency>
<dependency>
<groupId>commons-codec</groupId>
<artifactId>commons-codec</artifactId>
</dependency>
</dependencies>
<build>
<pluginManagement>
<plugins>
<plugin>
<groupId>org.springframework.boot</groupId>
<artifactId>spring-boot-maven-plugin</artifactId>
</plugin>
</plugins>
</pluginManagement>
</build>
<repositories>
<repository>
<id>spring-snapshots</id>
<name>Spring Snapshots</name>
<url>https://repo.spring.io/libs-snapshot-local</url>
<snapshots>
<enabled>true</enabled>
</snapshots>
</repository>
<repository>
<id>spring-milestones</id>
<name>Spring Milestones</name>
<url>https://repo.spring.io/libs-milestone-local</url>
<snapshots>
<enabled>false</enabled>
</snapshots>
</repository>
<repository>
<id>spring-releases</id>
<name>Spring Releases</name>
<url>https://repo.spring.io/libs-release-local</url>
<snapshots>
<enabled>false</enabled>
</snapshots>
</repository>
</repositories>
|
对应的配置文件application.yml
1
2
3
4
5
| spring:
data:
solr:
host: http://root:123@127.0.0.1:8983/solr
|
2. 复现
关于solr的基本操作,如果有疑问的小伙伴可以翻一下我之前的搜索系列博文,满足你的扫盲需求;
核心的solr操作实例如下:
1
2
3
4
5
6
7
8
9
10
11
12
13
14
15
16
17
18
19
20
21
22
23
24
25
26
27
28
29
30
31
32
33
34
35
36
37
38
39
40
41
42
43
44
45
46
47
48
49
50
51
52
| @Data
public class DocDO implements Serializable {
private static final long serialVersionUID = 7245059137561820707L;
@Id
@Field("id")
private Integer id;
@Field("content_id")
private Integer contentId;
@Field("title")
private String title;
@Field("content")
private String content;
@Field("type")
private Integer type;
@Field("create_at")
private Long createAt;
@Field("publish_at")
private Long publishAt;
}
@Component
public class SolrOperater {
@Autowired
private SolrTemplate solrTemplate;
public void operate() {
testAddByDoc();
queryById();
}
public void testAddByDoc() {
SolrInputDocument document = new SolrInputDocument();
document.addField("id", 999999);
document.addField("content_id", 3);
document.addField("title", "testAddByDoc!");
document.addField("content", "新增哒哒哒");
document.addField("type", 2);
document.addField("create_at", System.currentTimeMillis() / 1000);
document.addField("publish_at", System.currentTimeMillis() / 1000);
UpdateResponse response = solrTemplate.saveDocument("yhh", document, Duration.ZERO);
solrTemplate.commit("yhh");
System.out.println("over:" + response);
}
private void queryById() {
DocDO ans = solrTemplate.getById("yhh", 999999, DocDO.class).get();
System.out.println("queryById: " + ans);
}
}
|
SolrTemplat定义如下
1
2
3
4
5
6
7
8
| @Configuration
public class SearchAutoConfig {
@Bean
@ConditionalOnMissingBean(SolrTemplate.class)
public SolrTemplate solrTemplate(SolrClient solrClient) {
return new SolrTemplate(solrClient);
}
}
|
开始测试
1
2
3
4
5
6
7
8
9
10
11
| @SpringBootApplication
public class Application {
public Application(SolrOperater solrOperater) {
solrOperater.operate();
}
public static void main(String[] args) {
SpringApplication.run(Application.class);
}
}
|
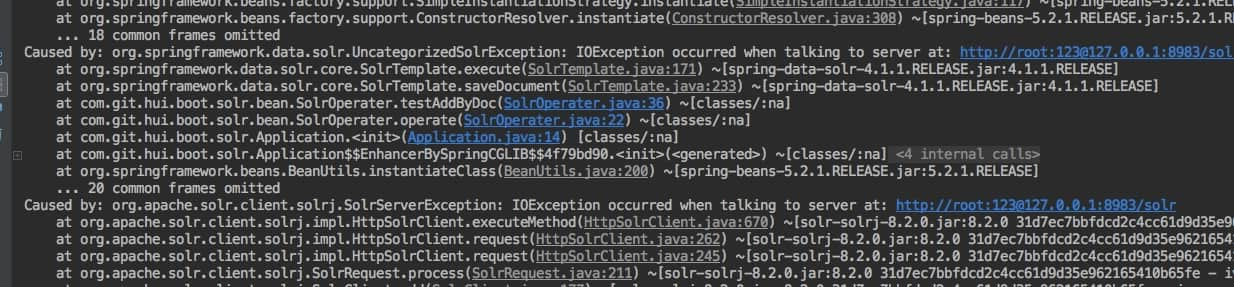
请注意,复现上面的场景时,会发现查询没问题,修改则会抛异常
3. 解决方案
a. 降版本
我之前用solr的时候,也是上面的操作方式,然而并没有出现过这种问题,这就有点蛋疼了;
找之前的项目查看版本,发现之前用的solr-solrj用的是6.6.5,换个版本试一下(默认的版本是8.2.0)
1
2
3
4
5
6
7
8
9
10
11
12
13
14
15
| <dependency>
<groupId>org.apache.solr</groupId>
<artifactId>solr-solrj</artifactId>
<version>6.6.5</version>
</dependency>
<dependency>
<groupId>org.springframework.boot</groupId>
<artifactId>spring-boot-starter-data-solr</artifactId>
<exclusions>
<exclusion>
<groupId>org.apache.solr</groupId>
<artifactId>solr-solrj</artifactId>
</exclusion>
</exclusions>
</dependency>
|
见证奇迹的时刻到了,执行正常了,虽然saveDocument方法的调用标红,但是不影响具体的执行哦

b. SystemDefaultHttpClient
通过一顿debug,单步执行,终于找到为啥6.6.5版本的solr-solrj可以正常操作,而8.2.0却不行(如果想知道这一枯燥的过程,请评论告诉我,否则我也不知道啥时候可以看到😂)
关键的问题就是旧版本的用的是SystemDefaultHttpClient来实现solr的沟通;新版本使用的是InternalHttpClient
那么一个可用的解决方法就是不降版本,改为指定Solr的HttpClient
在配置类中,如下操作:
1
2
3
4
5
| @Bean
public HttpSolrClient solrClient() {
HttpClient httpClient = new SystemDefaultHttpClient();
return new HttpSolrClient.Builder(url).withHttpClient(httpClient).build();
}
|
然后测试,也是正常执行,输出结果就不截图了,各位小伙伴可以亲自测试一下
c. HttpClient拦截器
关于下面的这段写法,来自: Preemptive Basic authentication with Apache HttpClient 4
上面的方式虽然可以让我们正确操作solr了,但是SystemDefaultHttpClient有一个删除注解,也就是说不建议再直接用它了,那就借鉴它的使用方式,来满足我们的需求,所以可以如下操作
1
2
3
4
5
6
7
8
9
10
11
12
13
14
15
16
17
18
19
20
21
22
23
24
25
26
27
28
29
30
31
32
33
34
35
36
37
38
39
40
41
42
43
44
45
46
47
48
49
50
51
52
53
54
55
56
57
58
59
60
| @Value("${spring.data.solr.host}")
private String url;
@Data
public static class UrlDo {
private String url;
private String user;
private String pwd;
private String host;
private int port;
public static UrlDo parse(String url) throws MalformedURLException {
URL u = new URL(url);
UrlDo out = new UrlDo();
out.setHost(u.getHost());
out.setPort(u.getPort());
String userInfo = u.getUserInfo();
if (!StringUtils.isEmpty(userInfo)) {
String[] users = org.apache.commons.lang3.StringUtils.split(userInfo, ":");
out.setUser(users[0]);
out.setPwd(users[1]);
}
out.setUrl(url);
return out;
}
}
public class SolrAuthInterceptor implements HttpRequestInterceptor {
@Override
public void process(final HttpRequest request, final HttpContext context) {
AuthState authState = (AuthState) context.getAttribute(HttpClientContext.TARGET_AUTH_STATE);
if (authState.getAuthScheme() == null) {
CredentialsProvider credsProvider =
(CredentialsProvider) context.getAttribute(HttpClientContext.CREDS_PROVIDER);
HttpHost targetHost = (HttpHost) context.getAttribute(HttpCoreContext.HTTP_TARGET_HOST);
AuthScope authScope = new AuthScope(targetHost.getHostName(), targetHost.getPort());
Credentials creds = credsProvider.getCredentials(authScope);
authState.update(new BasicScheme(), creds);
}
}
}
@Bean
public HttpSolrClient solrClient() throws MalformedURLException {
UrlDo urlDo = UrlDo.parse(url);
CredentialsProvider provider = new BasicCredentialsProvider();
provider.setCredentials(new AuthScope(urlDo.getHost(), urlDo.getPort()),
new UsernamePasswordCredentials(urlDo.getUser(), urlDo.getPwd()));
HttpClientBuilder builder = HttpClientBuilder.create();
builder.addInterceptorFirst(new SolrAuthInterceptor());
builder.setDefaultCredentialsProvider(provider);
CloseableHttpClient httpClient = builder.build();
return new HttpSolrClient.Builder(url).withHttpClient(httpClient).build();
}
|
上面的实现有点长,简单的拆解一下
UrlDo: 解析solr的url,得到我们需要的host + port + user + passwordsolrClient: 在创建SolrClient bean实例时,指定相应的授权信息SolrAuthInterceptor: 自定义拦截器,更新authState信息
d. SolrRequest
上面的三种方式,适用于利用SolrClient或者SolrTemplate来操作的solr;当然我可以完全抛弃掉它们,直接使用SolrRequest来操作,如下
1
2
3
4
5
6
7
8
9
10
11
12
13
14
| SolrInputDocument document = new SolrInputDocument();
document.addField("id", 999999);
document.addField("content_id", 3);
document.addField("title", "testAddByDoc!");
document.addField("content", "新增哒哒哒");
document.addField("type", 2);
document.addField("create_at", System.currentTimeMillis() / 1000);
document.addField("publish_at", System.currentTimeMillis() / 1000);
UpdateRequest updateRequest = new UpdateRequest();
updateRequest.setBasicAuthCredentials("root", "123");
updateRequest.add(document);
UpdateResponse response = updateRequest.process(solrClient, "yhh");
updateRequest.commit(solrClient, "yhh");
|
4. 小结
本篇博文主要是针对需要登录验证的solr更新操作异常时,给出了四种解决方案
- 降
solr-solrj版本到6.6.0
- 指定
SolrClient的HttpClient为SystemDefaultHttpClient
- HttpClient拦截器
- SolrRequest指定用户名密码
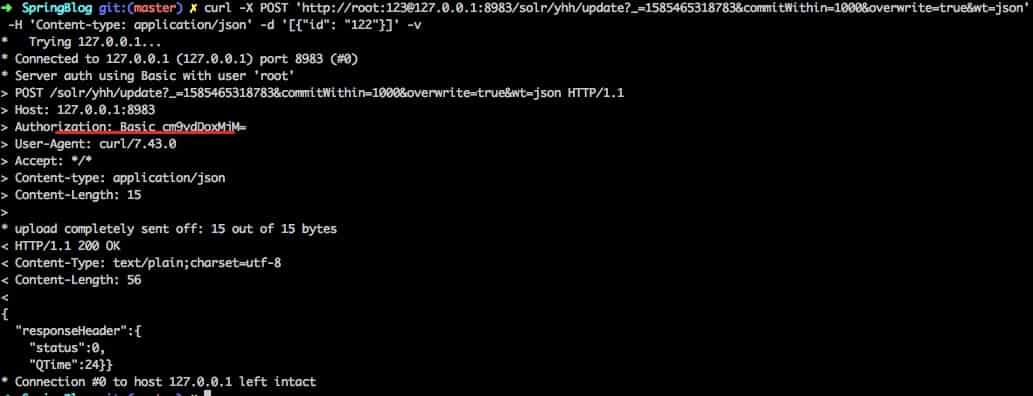
上面虽然给出了解决方法,但是为啥有这个问题呢?
直接通过curl来测试一下更新solr操作,正常返回,并没有问题,那么这个问题到底啥原因,究竟是谁的锅,请敬请期待后续问题定位盖锅定论
II. 其他
0. 系列博文&工程源码
参考博文
系列博文
工程源码
1. 一灰灰Blog
尽信书则不如,以上内容,纯属一家之言,因个人能力有限,难免有疏漏和错误之处,如发现bug或者有更好的建议,欢迎批评指正,不吝感激
下面一灰灰的个人博客,记录所有学习和工作中的博文,欢迎大家前去逛逛

打赏
如果觉得我的文章对您有帮助,请随意打赏。

微信打赏

支付宝打赏